by

SharePoint Resources

SharePoint 2010
  • FAST Search Server 2010 trial - Microsoft FAST Search Server 2010 for SharePoint is a new search solution that delivers the power of FAST with the simplicity and TCO of Microsoft. It provides the best general productivity search on the market AND makes it easy and economical to build high-value search applications.
  • SharePoint 2010 Virtual Machine - This download contains a two Virtual Machine set for evaluating and demonstrating Office 2010 and SharePoint 2010. Additional training material can be found here and here. Here are resources for VS2010
  • SPG2010 Guidance – SharePoint Guidance drop notes
  • Technical Diagrams (posters) - these resources are visual representations of recommended solutions. include poster-sized documents available in formats including Microsoft Office Visio 2007 files (.vsd), PDF files, and XPS files
  • Evaluation Guide SP 2010 - This evaluation guide is designed to help IT pros gain sufficient knowledge and understanding to evaluate Microsoft SharePoint Server 2010
  • Broadcast PowerPoint on SharePoint 2010 - Guide to installing and configuring a solution for broadcasting Microsoft PowerPoint slide shows
  • Professional Developer Evaluation Guide - The SharePoint 2010 developer evaluation guide describes the SharePoint 2010 developer platform, including walkthroughs of some of the new capabilities for developers
  • SharePoint Developer Platform Wall Poster - The SharePoint 2010 Developer Platform wall poster shows a view of the SharePoint 2010 developer tools, community ecosystem, execution environment, Sharepoint Server 2010 workloads, and target application types. The poster is intended to be printed at 24 inches x 36 inches (61 centimeters x 91 centimeters)
  • Developer and IT Professional Learning Plan - A guide to learning about SharePoint 2010 for Developers and IT Pros
  • Getting Started with Development on SharePoint 2010 handson labs - Use these 10 hands-on lab manuals for SharePoint 2010 to get started learning SharePoint 2010 development
 
WSS
 
SharePoint 2007
  • Technical Diagrams (posters) - poster-sized documents with visual representations of recommended solutions
  • Sharepoint Server 2007 Virtual Disk - This download comes as a pre-configured VHD. This download enables you evaluate Microsoft Office SharePoint Server 2007. Virtual Server 2005 R2 is required to run this VHD.
  • Sharepoint 2007 SKD - The Microsoft Office SharePoint Server 2007 SDK contains conceptual overviews, “How Do I…?” programming tasks, developer tools, code samples, references, and an Enterprise Content Management (ECM) starter kit to guide you in developing solutions based on Microsoft Office SharePoint Server 2007
  • MOSS Virtual Disk - This download comes as a pre-configured VHD. This download enables you evaluate Microsoft Office SharePoint Server 2007
  • VisualStudio 2008 Extensions 1.3 (VSeWSS) - SharePoint project and item templates for Visual Studio 2008 - VSeWSS 1.3 (Feb 2009 CTP)
  • Accessibility Kit For Sharepoint - free downloadable kit that helps you to quickly implement WCAG 1.0 compliant sites
  • Sharepoint Guidance Kit - This guidance helps architects and developers design, build, test, deploy, and upgrade SharePoint intranet applications. A reference implementation demonstrates solutions to common architectural, development, and application lifecycle management challenges.
  • WSP Builder - A SharePoint Solution Package (WSP) creation tool for WSS 3.0 & MOSS 2007
  • STSDEV - A SharePoint developer's utility designed to quickly transform your ideas into real-world components that you can deploy into a staging or production Web farm with confidence.
  • Ten Themes for Sharepoint in VWeWSS - This is a set of ten Visual Studio 2008 extensions for SharePoint projects containing designed themes for SharePoint
  • Microsoft Web Platform Installer – One-click setup your whole development environment
  • Governance Check List for Sharepoint – A collection of hand-selected checklists and tips to provide comprehensive governance when implementing Sharepoint
  • Windows Sharepoint Services 3.0 SKD - The Windows SharePoint Services 3.0 software development kit (SDK) contains conceptual overviews, programming tasks, samples, and references to guide you in developing solutions based on Windows SharePoint Services 3.0
  • Managed Stack Explorer - if you want to troubleshoot hangs/performance issues in a process but don’t want to go through the hassle of getting and analyzing a dump.   What it will do is basically attach, snap the .net call stack and detach so you can see what all the .net threads are doing without using a debugger.
  • SharePoint Productivity Hub – The Productivity Hub is a Microsoft SharePoint Server 2007 site collection that offers training materials for end-users.

By

by

Disabling workspace meeting creation from SharePoint Calendar

In many big implementations for SharePoint, TeamSites is a great tool for collaboration and for user-driven participation.
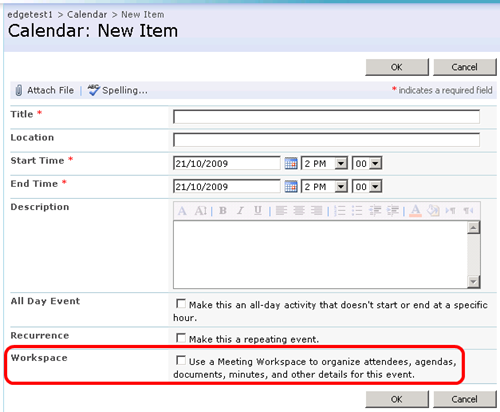
There is also another functionality in SharePoint called Workspaces, which is a small cut-down version of what a TeamSite can offer. Workspaces normally can be used to track meeting minutes, small task forces and general gatherings and its automatically creation is found inside the calendar items, which makes the creation so easy by the users. All they have to do is to flick the checkbox and click OK.
For the big enterprises, it does not make much sense to implement TeamSites and still have to manage Workspaces due to the similarities it had to Team Sites, and specially when it is so easy to create on a uncontrolled manner.
So what how to disable workspaces creation and avoid the meeting workspaces proliferation?
you can achieve this in many ways. I can tell you the most common use found on the Internet: the JavaScript solution.
It is very simple to implement. Basically you drop JavaScript in the page and the JavaScript will look for the html row that contains the workspace checkbox creation, then once found make it invisible. In fact the option is still there, the users just cant see it anymore.
From an implementation point of view, that's straight forward and many users of many levels can actually do this. From a governance and architectural point of view, that's not the best recommended:
  1. it will introduce new code into SharePoint ecosystem, and potentially a new debug variable.
  2. it does not scale well.
  3. it is vulnerable to malicious code.
  4. an advanced enough user can in fact bypass that barrier by cross-scripting himself that option to be visible again
The other approach would be to understand SharePoint and how it works internally. Always have in mind that SharePoint was not meant to be modified, but extended or configured. If you research enough might find that this setting can be controlled.
sharepoint-disable-workspaces
To remove the option to create workspaces in SharePoint, you need to go to:
...12 hive folder\TEMPLATE\FEATURES\EventsList\Events
Edit the file called schema.xml (I would recommend to make a backup copy, as well) and edit the field to be like that:
59 <Field ID="{08fc65f9-48eb-4e99-bd61-5946c439e691}"
60 Type="CrossProjectLink" Name="WorkspaceLink"
61 Format="EventList" DisplayName="$Resources:core,Workspace;"
62 DisplayImage="mtgicon.gif" HeaderImage="mtgicnhd.gif"
63 ClassInfo="Icon" Title="$Resources:core,Meeting_Workspace;"
64 Filterable="TRUE" Sealed="TRUE"
65 SourceID="http://schemas.microsoft.com/sharepoint/v3"
66 StaticName="WorkspaceLink"
67 ShowInEditForm="FALSE" ShowInNewForm="FALSE">
the 2 new attributes ShowInEditForm and ShowInNewForm will control the workspace checkbox visibility.
Did you like that? :)
Update: Aapo from SharePoint Blues just mentioned another way to perform this operation. You should check that out.

By

by

How to programmatically configure RSS feed for a list in SharePoint

Here's another interesting story. SharePoint will overwrite all the RSS columns you might have setup for a list.
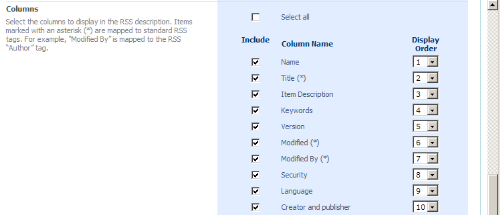
One of the tasks I was working was to process across all the list in all the sites of a specific site collection, then enable RSS settings for each list and set a predefined group of columns as the RSS output. Once that's done, one could easily go to the list settings and verify them like the figure below:
1
The whole process executed with no problems. No error messages and no warnings.
However, when I went to take a look at my modified RSS settings that's the screen I saw:
11
It means, nothing was setup the way I planned. Apparently nothing happened when the code executed.
So I went to debug and inspected the line one by one. No error and when I went to see the screen, that's what I've got:
 1
Yep. Everything was there and working.
How come it fails in first place and worked well on my second try?
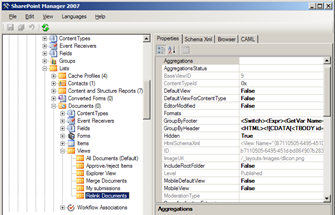
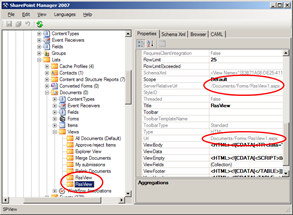
This behavior continued on and on and and on, with many other libraries. Fails the first time, succeed in the second. So I went to look at the data definition using SharePoint Explorer. For a brand new library, that's what I saw:
4
And that's how it looks like once I execute my code to create a new RSS feed:
 5
All right. It means the RSS is actually there. So I went to see the RSS settings in the page and guess what...That's what I see:
11
The RSS is blank again!!!
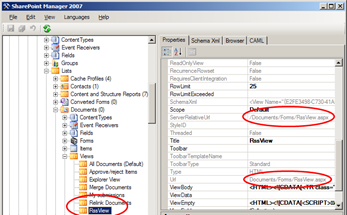
Then I came back to see using the explorer and...
6
Voila... something is kick-starting the creation of a brand new RSS setting and overwriting my one for usage.
I had a guess but it was just too weird to believe: SharePoint creates automatically a RSS feed for the first time and only during the first time an user visits the settings page.
I decided to debug the page and try to understand what SharePoint calls are made via UI. I've got my hands on the _layouts/listsyndication.aspx page from SharePoint
2
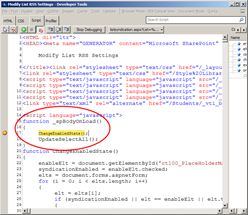
and I attached a debugger to it. I chose a brand new document library to test my theory and during the first page load I got this breakpoint:
 3
During the page load there is javascript call to the server triggering SPList.EnsureRssSettings()
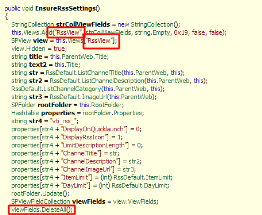
Then using .NET Reflector I opened the Microsoft.Sharepoint.Dll version 12 and found the method signature:
8
Looking inside the method I noticed:
  1. SharePoint does use a hardcoded string ("RssView") to control the RSS name and which view is a RSS type.
  2. EnsureRssSettings in fact creates a brand new Rss feed for you, without your request.
7 
So, debriefing the case. When you open up the settings page, the listsyndication.aspx page automatically performs a call to SPList.EnsureRssSettings() which automatically creates a RSS feed (if syndication is enabled) and makes it invisible (see property Hidden=true). When my code ran, it created another view with the same name RssView, but actually the web address was different. The next time the code executed, I was not working anymore with my view but with the previously automatically created Rss from SharePoint.
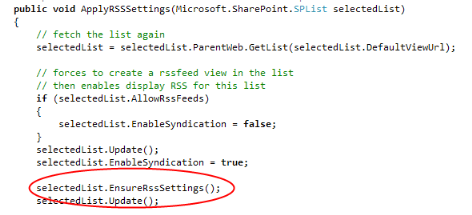
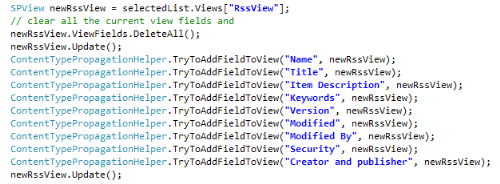
Closing up the case: Next time you need to create a Rss feed, you don't have to create a view. You just have to make sure you call in your code SPList.EnableRssSettings() and then go ahead and modify the SPList.View called "RssView"
Now, the code:
c0
and then to save the Rss feed...
 c1
See you later,

By

by

Versioning Settings and Picture Libraries Issues


Can you imagine a news website without any sort of control for the pictures being uploaded to the front page?
Content types (CT) are a big part of any well-planned content management system. In our enterprise we have a dedicated content team who is in control of the CTs for the CMS. They are extremely good at what they do and they really have a good grasp about the business, its processes, documents and metadata. Unfortunately, to deal with legacy systems is the issue and our legacy issue is to unify all the websites and its lists with its correct content types.
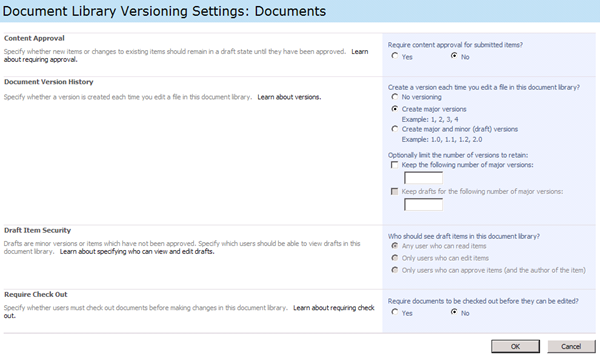
Early this week I had to find a way to setup and modify the versioning settings for the lists of our sites. As we can see, this can easily be done via Site Settings option. The issue here is that we have hundreds of sites, not to mention all the Team Sites, across all the enterprise. And possibly thousands of libraries. Meaning: It is impracticable to do this via UI. So, programmatically was the choice.
splist-versioning-control 
And honestly, this choice did not look so hard… at first at least.
The SPList object model exposes to us all the properties necessary do control these options enumerated in the page (as we will see in our code later) but make no mistake, the solution is not as trivial as one might think. The biggest problem is here: Enable Content approval.
Let’s do a short parenthesis here and reflect about this matter, from the business point of view.
And that’s a vital piece of functionality. Imagine a news website, like www.CNN.com or www.BBC.co.uk, possibly with hundreds of employees/contractors  working on the website content. They write news stories, upload pictures etc. As an editor, would you give them any level of access they want?  Of course not. In the ideal model, we must have a group of people responsible to approve the content being displayed to the public (i.e. using the Content Approver role). The last thing an editor wants to see is some crazy text flaming around everyone and displaying unacceptable behaviour (i.e. a text with racist remarks), or a picture that does not reflect the news report, or even worse, a picture that can potentially harm the viewers for being shown in the public.
To make short a long story: A content-based enterprise needs someone to be responsible for content approval.
Now, coming back to our technical venue.
 
splist-versioning-control-2
 
Of course we want to enable content approval. So we go ahead and call:
SPList.EnableModeration = true
And out of the blue during some point of the execution an exception is thrown every time this line is called. That was a surprise for me.
So I went on to MSDN to read about the property and the object and…no clues or answer to be found. I went to see what happened with the other libraries using the same code. In the vast majority of the libraries where I ran that code, they let me update this property, but a few did not. so, what went wrong?
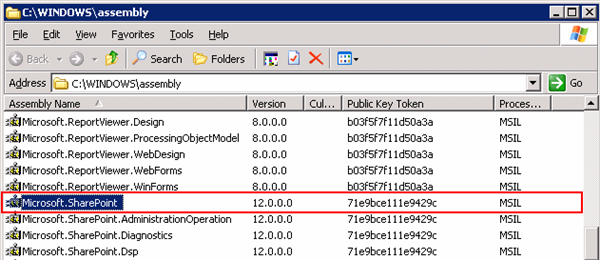
Then after some research and no clear answer, I decided to debug the SharePoint DLL via code reflection. I went to see on MSDN which of the SharePoint DLLs contains the SPList object and as indicated it is the Microsoft.SharePoint.DLL.
 microsoft-sharepoint-assembly
I’ve got the DLL and then compared the signature of my reflected copy against the copy installed in the GAC. Just to make sure we all were talking about the same “story”.
    splist-enable-moderation-2
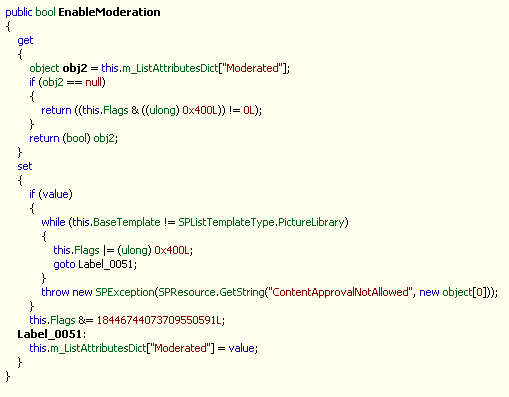
Note the member signature. There is nothing unusual here. It is a get / set, but let’s take a closed look at the SET method:
splist-enable-moderation-1
Interesting. “if the base template is a picture library then ERROR”.
Regardless of any test or comment. If we are dealing with a picture library, it seems to me that you can not enable content approval for it in SharePoint and immediately an exception is thrown.
IMO, I find this quite odd because in other instances, similar to this case, it is common place to expose another member to validate this test. For example, I would look for something like along the lines SPList.CanEnableContentApproval.
Anyway, moving on, problem found. I am not sure why content approval is not available for picture libraries. Indeed, if you go to the versioning settings for a picture library you won’t even see these options listed.
The solution : As of today, for me the way out of this is to use document libraries to handle the approval process for images. (if you have any other strategies for this matter, please let me know)
Now let’s take a look at the code to handle the full versioning control. Enjoy.
 
    1         /// <summary>
    2         /// Applies the versioning settings to the list.
    3         /// </summary>
    4         /// <param name="selectedList">The selected list.</param>
    5         public void ApplyVersioningSettings(Microsoft.SharePoint.SPList selectedList)
    6         {
    7             // enable content approval for this list
    8             // moderation is not supported for picture library types
    9             if (selectedList.BaseTemplate != SPListTemplateType.PictureLibrary)
   10                 selectedList.EnableModeration = true;
   11 
   12             // enable versioning for this list
   13             selectedList.EnableVersioning = true;
   14 
   15             // set security to only users who can approve and the actual content author
   16             selectedList.DraftVersionVisibility = DraftVisibilityType.Approver;
   17 
   18             //enable minor versions for this list
   19             selectedList.EnableMinorVersions = true;
   20 
   21             //set YES to forced checkin/checkout required
   22             selectedList.ForceCheckout = true;
   23         }
 
See you later

By

by

How to Modify SharePoint List RSS Settings Programmatically

RSS is a great thing. It streamlines easily the communication between a content provider and its readers. RSS nowadays are everywhere. News sites, blogs, content driven sites. By subscribing to a RSS feed you can reach a broader audience by eliminating the need of a computer, just have a mobile with RSS reader capabilities and you are good to go. As a powerful content management tool, of course SharePoint enables RSS syndication for its contents.
Let’s take a look at the UI page where we can configure the RSS feed of a document library:
sharepoint-configure-rss-setting
So, can we customize the RSS features exposed by a SharePoint library programmatically ? The answer is yes, but unfortunately this task is not as straight forward as one might think.
If you look the SPList properties, you will not find anything related to them. If you look at the SPListItems, you will not find anything related to them.
So where are these properties? They are in fact in the RootFolder property of the list. The RootFolder is an object of type SPFolder and sets various properties for the files and contents associated with the list as a collection of items.
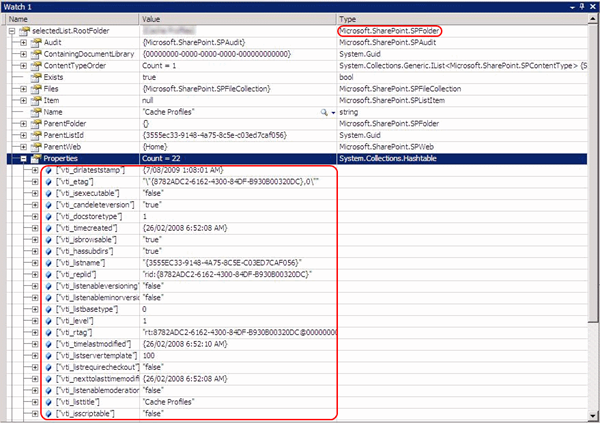
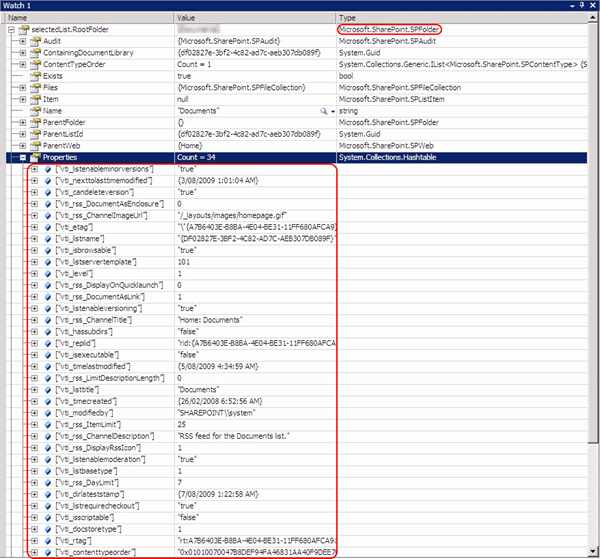
And guess where these RSS feeds settings are specified? Yes, in that same collection, exposed as a key-value pair. But even if you try to inspect that with your preferred tool, you won't be able to see it clearly. Not even with SharePoint Manager sometimes. For example, take a look at these 2 RootFolders properties, from 2 different SPLists, being visualized with SharePoint Manager.
spm-sharepoint-manager-splist-rss-2
spm-sharepoint-manager-splist-rss-1
So…You see, the first one does not expose any RSS related property values, but the other one does. That's because the later has  SPListTemplateType.DocumentLibrary as its base type.
Since the SharePoint operations and behaviours rely extremely on the exposed APIs, we would assume these are the kind of stuff you would have access via an API call. I for one was not expecting to modify straight into the property values of a key-value par exposed by a SharePoint collection itself. Yeah, pretty tricky. SharePoint does its own things by its own ways. 
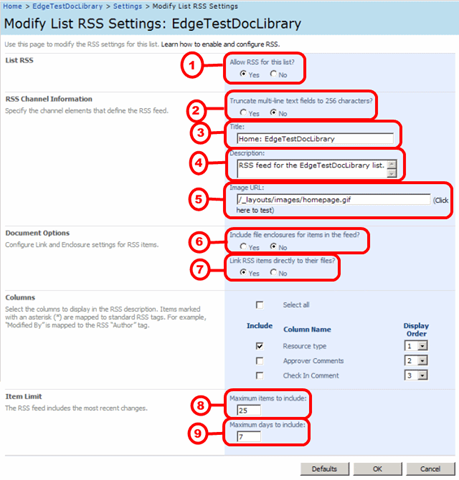
Anyway, these are the things you can modify from our RSS settings screen:

sharepoint-configure-rss-setting2
1) EnableSyndication : internal property, refer to the code below
2) vti_rss_LimitDescriptionLength : Controls if the item content will be exposed complete in the feed of just the first 256 characters.
3) vti_rss_ChannelTitle : name the RSS feed
4) vti_rss_ChannelDescription : Short text to describe the feed
5) vti_rss_ChannelImageUrl : Specifies which image will be displayed when a RSS reader consumes the feed
6) vti_rss_DocumentAsEnclosure : Indicates if will any documents associated with the feed are included as enclosure. ( I assume, becaue I have not tested that to explain better )
7) vti_rss_DocumentAsLink : Indicates if you can expose the documents included in the feed as link direct to the file. Very common for podcast RSS feeds, for example.
8) vti_rss_ItemLimit : Limits how many items are going to be exposed in the feed
9) vti_rss_DayLimit : Limits how many days will the feed content display. This will work combined with the vti_rss_DayLimit; the most restrictive one, wins.


Also there are some more fields that are not exposed by the UI, but still exists in property collection:
vti_rss_DisplayRssIcon : Indicates if the image in the vti_rss_ChannelImageUrl is an icon file. It will be displayed in the navigation bar of web browsers, for example.
vti_rss_DisplayOnQuickLaunch : I did not test that, but I imagine it will add the feed to the quick launch links in the homepage.
After all the settings were done, there is one more catch: Call the Update() method not from the list, but from the RootFolder object.

Now, the code to set them:

    1         public void ApplyRSSSettings(Microsoft.SharePoint.SPList selectedList)
    2         {
    3             // display RSS for this list
    4             selectedList.EnableSyndication = true;
    5 
    6             // set NO to truncate RSS multiline text to 256 chars
    7             selectedList.RootFolder.Properties["vti_rss_LimitDescriptionLength"] = 0;
    8 
    9             // set NO to include file enclosures
   10             selectedList.RootFolder.Properties["vti_rss_DocumentAsEnclosure"] = 0;
   11 
   12             // set YES to link rss to files
   13             selectedList.RootFolder.Properties["vti_rss_DocumentAsLink"] = 1;
   14 
   15            
   16 
   17             // set RSS maximum items to 25
   18             selectedList.RootFolder.Properties["vti_rss_ItemLimit "] = 25;
   19 
   20             // set RSS maximum days to 7
   21             selectedList.RootFolder.Properties["vti_rss_DayLimit"] = 7;
   22 
   23             // commit the changes to the list
   24             selectedList.RootFolder.Update();
   25         }

See you later

By

by

How to apply custom permissions to a list in SharePoint

In Windows SharePoint Services, all the lists are assigned inherited permissions from the container site by default. So how can we programmatically change these permissions to our own?
First we must understand how WSS controls access to its objects.
sharepoint-splist-Untitled
The access model for websites, lists, document libraries, picture libraries, task lists, workflows etc follows a role-based membership model. One might even say that's quite expected since WSS extends the capabilities of the ASP.NET as an application itself and .NET has a very flexible role-membership model framework. 
In this role-membership system, SharePoint users are assigned to specific roles, specifying what kind of access he/she will have (full access, read-only, write-access etc).
You can do this just like SQL Server, where groups are created and then users are included in these groups. The next step is to go to the Sharepoint object (a list, for example) and assign permissions to that group; but SharePoint extends this model one step further by creating role assignments.
sharepoint-splist-Untitled5   sharepoint-splist-Untitled4
A Role assignment is an object that binds roles and groups/users. This role assignment object can then be grouped in collections and that's where sharepoint do the trick: All the list objects in WSS implement a collection os role assignments which makes this approach the best and most scalable way to set permissions. Such a model can even be extended to apply to specific permissions to specific list items within the list. Even websites implement a collection of role assignments.
sharepoint-splist-Untitled3
Can you create a role assignment for a specific user without specifying the role?
Yes, we can. The user will be listed in the collection for the object but he won't have access to the object. So it's really pointless doing this.
Can we cascade permissions across lists?
Yes, we can. Not only across lists but all the objects. By default SharePoint will let you inherit the object's parent permissions. This behaviour, by the way, can also be modified programmatically as we will see later.
Can we assign specific permissions for just a group of items within a list?
Yes. And the process is very similar to the one we are going to demonstrate here.
What is the highest group on a SharePoint site collection? Is there such a super group?
yes, it is called cross-site group. It is an OTB functionality and by default has 3 sub-groups: Owners, members and visitors. Owners are the site administrators, members are the people who can have write-access to the site, visitors are the guests and can only read information.
sharepoint-splist-custom-permissions-1
So, any given user only becomes an effective SharePoint user once it is assigned to a role. You can take a look at the base permissions querying Microsoft.SharePoint.SPBasePermissions.
Now...In our case, we will remove all the predefined permissions for a given task list and set our own permissions. Only the people who are site administrators will have access to it.
sharepoint-splist-Untitled2
First thing is to break the inheritance to the list. That will untie the link between the list and its parent's permissions. The immediate effect you will notice on this command is that the UI will change accordingly.
sharepoint-splist-custom-permissions-0
NOtice how the menu in the UI get updated. You won’t see the tab refferring to the parent’s permissions anymore, instead you will be presented with an option to edit the permissions by user and a new option to revert the operation, which is to inherit again the permissions of parent.
 sharepoint-splist-custom-permissions-00.jpg
Returning to our case. Once we break the relationship to the parent,  we will need remove all the permissions in the list. If we could take a look at the UI during the code execution we would see a list like this.
sharepoint-splist-custom-permissions-2
with absolutely no users with permission to access the list. Note how dangerous this operation can be. If for some reason we left the code at this stage of execution we would compromise the SharePoint's health status and the implications can be very upsetting specially if the list is touched by many users or displayed in other sites.
So the next step is to setup the user we want to give the permission. In our case we want to give access to this list only to people in the administrators group.
Take a minute to see how we perform this.
Remember when we talked about the Roles and the Groups. Well, these are represented by the classes SPRole and SPGroup. So we will at some point need to have that information at hand. We extract the desired role R out of our website roles collection and our group G out of the website group collection.
sharepoint-sprole                 sharepoint-spgroup
There is a special trick here. In order for the group G useful in anyway, we need give a live identity to it. We will use the SPPrincipal object for that. SPPrincipal comes from the SharePoint super-class SPMember and it is the object that represents an user or a group within a website in SharePoint. Any user and any group attached to a site in SharePoint is automatically a SPPrincipal object and he will provide all the role-membership mechanisms for integration with the system.
sharepoint-Untitled
In older versions of Windows SharePoint Services SPRole and SPGroups were used combined and straight to configure the permissions. These objects are now obsolete for that function and the recommended approach is to instantiate a SPRoleAssignment. The SPRoleAssignment will be produced by associating the selected group plus the principal identity. Once you have your SPRoleAssignment setup based on the group, you then add the SPRole to the exposed collection.
The next steps are very direct. We bind the SPRole to the SPRoleAssignment…
sharepoint-sproleassignment 
And we add the SPRoleAssignment to the RoleAssignmentCollection exposed by the SPList.
sharepoint-sproleassignment-collection
We create a SPGroup and SPRoleDefinition objects based upon the existing site groups and roles in our site. The reference to the site can be accessed via the SPList object itself. Since we have that information now in our hands, we can then combine them with a SPRoleAssignment object and then add this assignment to the collection of assignments that belongs to the list. Our method is pretty atomic, and at some point a SPList.Update() call must be made in order to persist the changes we’ve done.
If everything went according to our plan, we should now see a list like this in our UI:
sharepoint-splist-custom-permissions-3

If you want to apply specific permissions to the items of this list, the only additional piece of code you must add is a loop around the SPList items and set the properties in the chosen SPLIstItem object.
Now the code:

   11         private void SetPermissionsForTheList(SPList selectedList)
   12         {
   13             // breaks the inheritance from the parent
   14             selectedList.BreakRoleInheritance(true);
   15 
   16             //removes all the permissions from the list, except for 'site - admins'
   17             while (selectedList.RoleAssignments.Count > 0)
   18                 selectedList.RoleAssignments.Remove(0);
   19 
   20             if (selectedList.RoleAssignments.Count == 0)
   21             {
   22                 // get the defined site admins group
   23                 SPGroupCollection groupCollection = selectedList.ParentWeb.SiteGroups;
   24                 SPGroup group = groupCollection["Site - Admins"];
   25 
   26                 // get the full access role definition
   27                 SPRoleDefinitionCollection roleDefCollection = selectedList.ParentWeb.RoleDefinitions;
   28                 SPRoleDefinition roleDefinition = roleDefCollection [0];
   29 
   30                 // create a role assignment based on the site admin group
   31                 // and bind to the full access role definition
   32                 SPRoleAssignment roleAssignment = new SPRoleAssignment((SPPrincipal)group);
   33 
   34                 roleAssignment.RoleDefinitionBindings.Add(roleDefinition);
   35 
   36                 selectedList.RoleAssignments.Add(roleAssignment);
   37             }
 
As a final note, remember that all this can be accomplished via the interface and by doing this SharePoint will verify and test if any rule isn't being broken during the process. By doing this programmatically you are easily introducing a new level of complexity in the SharePoint ecosystem. Via code, you can set any kind of permissions you want to any given user. PLAN AHEAD. Make sure you are not overwriting permissions that can be conflicting with other areas in the site collection.
See you later.

By

by

Funny Error Messages in SharePoint Designer

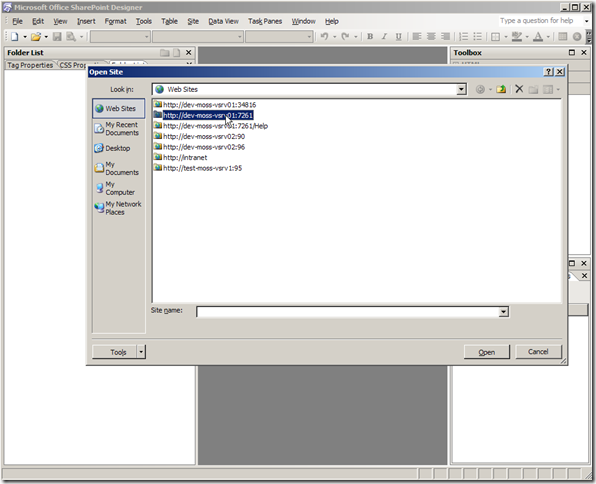
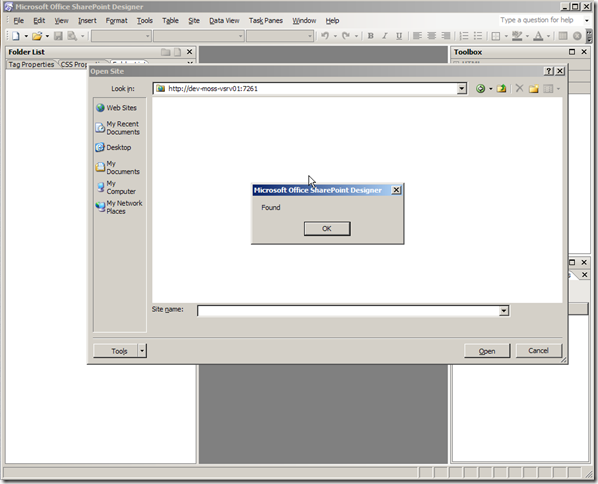
That’s a very curious one. I have setup a custom authentication provider for my project. I replaced the Windows Authentication and used my own which is based on the .NET custom membership provider. So I tried to open the site using SharePoint Designer and do a little master page update.
ScreenShot001
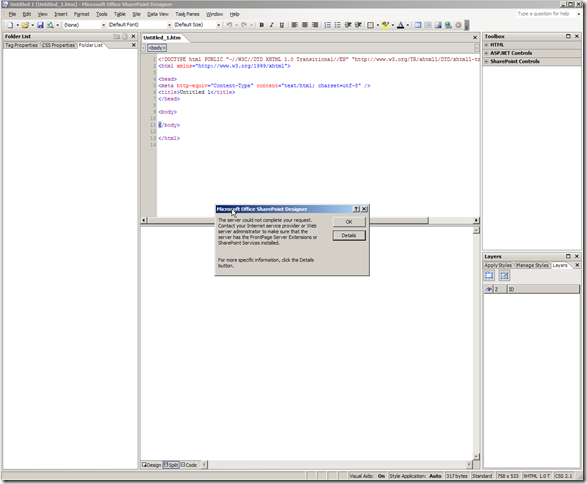
When I’ve received this “neat” error message which, by the way, does not help in anything:
ScreenShot002
That sounds pretty much like one of those debug messages used during COBOL times, when a programmer had to write something on the screen in order to verify if some criteria in the application logic was met.
Anyway…I just clicked the OK and then another error:
ScreenShot004
Surely that’s a more “understandable” error message. Or at least it sounds like a decent error message. Then I said myself: “ok, now maybe the next one can explain all this mess”
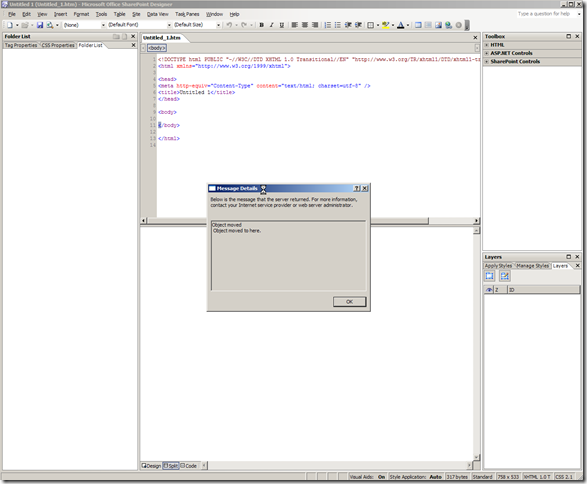
So I clicked ok and I’ve got this amazing one
 
ScreenShot003
“Found. Object moved. Object moved on here.” That’s awesome. By then my colleagues were all having a laugh at it. That’s almost like an urban legend coming to life. The case of the programmer who left debugging error messages in the application, forgot to remove the code and the application went to market with these messages.
Yeah, it smells like one of those programmer messages left in the application during test that ended up in production. Hopefully Microsoft will revamp the SharePoint Designer so we can have a decent environment up to the level required by WSS.

By

by

How To Recycle IIS Application Pool Manually via DOS Command ?

As a .NET programmer and an avid user of the Global Assembly Cache when dealing with SharePoint one of the things that I have to use most to test my solutions is to recycle the application pool, so that I can put my newly created DLLs and test them.
I use a lot WSPBuilder for this task, but I always wondered : How can I recycle the application pool via command prompt ?
In case you ever wonder the same and still don’t know how to do it, here’s how:
restart-application-pool-script-2
the cscript command is pretty neat. And mostly the Microsoft Platform applications have a .vbs file assigned to them, so give it a try and try some other cool stuff in other apps.
restart-application-pool-script-1
See you later,

By

by

Sharepoint Tips and How Tos

by

How to do Site Branding in SharePoint?

One of the main selling points for implementing SharePoint are its content management capabilities.
This week I went to a client demonstration of our new site and I noticed that a MOSS enabled website is really appealing to them (end users) but not so much because the underline features or that cool RSS integration you demonstrated but mainly because the ability to manage and roll out content on the web itself.
 
sharepoint-sections
 
As a topic of later discussion amongst us something was obvious: people do not really understand what’s the concept of Site Branding, and for that I believe it is paramount for us consultants to deliver this message for them very clear so they can have a better grasp of their brand new SharePoint site they will be maintaining themselves when we finish the project.
sharepoint-webpart
So what is site branding from SharePoint's point of view?
It is called Web Content Management, WCM, and it’s function is to make a clear cut between what’s site branding and site content.
Site Branding is created by a marketing team, normally a group of designers and sometimes for developers. It responds to questions such as site navigation, look and feel, style etc. In other words, it is about HTML, CSS classes, icons, master pages, page layouts etc.
Site Content is created by site managers, contributors, editors etc. They have the task to choose the layout, choose the icons and images to be displayed in the site sections, they add videos to the pages, they populate the text with links to other relevant sites and contents etc.
So, now that we have this picture well defined we can infer that developing a SharePoint website is also to determine the underline appearance of the site itself.
sharepoint-master-page
Normally the task to develop the branding is handled over to a 3rd party company. Someone specialised in websites, and better matching colours and with experience to create a visual identity. As a matter of fact, Microsoft has made available to the general public all the CSS classes used by a typical Windows SharePoint Services application (WSS), they can be seen here
Honestly that’s a concept one has to capture and, like most things in life, it takes practice.
If you are a power user, a site editor, a tester, business analyst, project manager or any other role involved in a SharePoint site that doesn’t need to know how the things works under the hood (workflows, code, architectural designs, service contracts etc) and you are interested in learn more about site customization using SharePoint I suggest to read this 3 part series from MSDN, specifically targeting the Web Content Management features of SharePoint.
You see, handling the client’s expectations with the project its not only meeting the deadlines and delivering the project but also empowering them on the tools they can within SharePoint itself so next time they come talk to you asking for a new variation they will be more aware of the things he can or can’t do.
If you need any more information about how to do branding in SharePoint feel free to email of leave a comment.
See you later

By

by

How to Design a SharePoint Application to the Cloud

There is a very common misconception about the uses for SharePoint and I would like to talk about one of them: Using SharePoint as a file repository. Of course SharePoint has great features to enable file sharing and versioning control across the enterprise, but is it so much more than this. So I decided to elaborate a challenge: How would you go about to setup a SharePoint/MOSS solution as an application architecture?
And let’s make the challenge a bit more interesting, shall we. WPF Composite Application Guidance (PRISM), Windows Azure, Sculpture, MVC, ASP.NET. What all these new technologies have in common? They all have deployment options for the Cloud.  So, our challenge will be not only design an application using SharePoint but also design a SharePoint application using the Cloud as subsystem.
 
How can we design an application for the Cloud?
There are many approaches, but I would say the most likely models are:
  • Line of Business running as services  that can keep their data in the Cloud and have web pages as UI.
  • Web applications hosted entirely in the Cloud.
  • Various systems designed as message-based applications using the Cloud as media and components like HTTP, REST and SOAP as protocols.
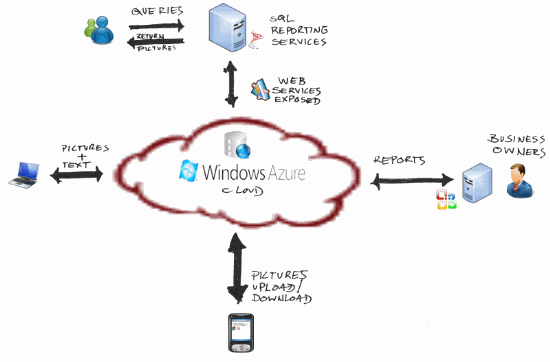
One of my passions is photography so let’s design an application where people can contribute with pictures to the cloud via SharePoint. In our case study, we have to consider the following scenario:
  • many pictures can be uploaded by a single user.
  • many users can submit their pictures at the same time from several locations across the world.
  • Every picture will have a little story about it. Whoever upload the picture must tell the story associated with it.
  • the pictures and the stories can have multiple formats
  • many devices can be used to upload the pictures (desktop, notebook, mobiles)
In the other side, we will have customers (agencies) consuming these contents via exposed services:
  • one agency can query as many times they want for shared and approved content.
  • many agencies can submit their queries at the same time
  • many devices can be used to query the results (desktop, notebook, mobiles)
 
So let’s take a look at our suggested model:
 
sharepoint-cloud
Our main enterprise application will be hosted in a SharePoint/MOSS application where the business owners can control it from there, use the BI tolls and apply KPI tools if they wish to. Also via developed custom web parts hosted in our SharePoint site they will have access and create reports targeting our File System impersonated by Windows Azure in the Cloud.
Web services will be developed and exposed using our own APIs to allow communication with our file system in the Cloud. At this point, we want to be agnostic and pragmatic. Just because we are using SharePoint and Microsoft Cloud, it does not mean we have to be attached to Microsoft tools. Since Web services and the Cloud itself work under well-known protocols any client can then interact with them. We can have desktops running Macs searching for pictures and text, we can have mobiles using embedded Java to upload pictures to our application and we can have other agencies using our own exposed API and integrating our system into theirs and querying the results via SQL Reporting Services via XML.

What should be our focus when designing such application ?
It does not matter the chosen technology provider. IMHO, the most important factors to cover here are: Scalability and Application Services

Why Scalability?
Let’s take a step back and think about how is this application going to be in 2 years time.  Scalability means provide a good tolerance for expansion without compromising the quality of service in our case. Overtime we expect a growing user base and file storage usage by pictures, descriptions, user profiles, texts or whatever it is; but not only this, we should expect a growing number of requests per day by users all over the place. If we wanted, we could even expose services as plug-in for third-party consumers to provide our services in their own applications. Scalability must provide enough room for this to grow in the future
That’s when comes a brand new concept: Infrastructure as a service. High scalability and high availability are the main features of such environment. Who today can offer such a worldwide service? the Cloud. and with another good thing to take: The Cloud is agnostic.
So, here we have our chosen infrastructure media.
We are going now to develop .NET custom code implementing the Windows Azure APIs and make them as components in our SharePoint application, which can be distributed in our SharePoint pages as web parts hosted on Web part Zones.
 
Why Application Services?
Here the biggest concern is relating to the many devices allowed by the system per user. It is impossible nowadays to have an application dictating what the user/client must use or not, and if you ever do this it will be in no time your competitor's biggest strength.
At the same time, many RIA – Rich Internet Applications are available and will want to be using such a service base, like iPod Touch and other mobile devices. To implement these we need to think about Composition Interfaces.
Composition Interfaces are many pieces of various design patterns combined to allow writing flexible UIs according to the user. We can even use ASP.NET adaptable rendering controls to minimize our design time. So by using a ASP.NET text box within a custom web part in our SharePoint site page to upload pictures, it will be rendered with no problems when this page is accessed via Firefox browser or a Nokia cell phone as well.
Flexible UIs allows us to develop both simultaneously and with personalization according to the user’s needs.
This given scenario is also a great model for sub locating tasks to other groups via design by contract.
To design an application by contract is to specify, document and make available all the expected inputs and returned outputs from our system, in our case our SharePoint site, so others can develop targeting our platform in a very interesting way because now you can give them a task, tell them the APIs to use (for uploading photos or querying texts) and they then develop the module based on the contract. It also introduces a very important aspect of it which is the atomicity. If their part somehow breaks down or has a bug, it won’t affect the main system because the calls specified by contract are already sanitizing the inputs and outputs.
Another added benefit is that such architecture is modular enough from the solution interface. You can clearly give a demonstration to the project’s stakeholders explaining the contract’s model and the interfaces without touching the internal processes and they will most likely to understand. It is like having a helicopter view of the solution.
So, there you go. Now when someone tells you that they use SharePoint to save files and share resources in their Intranet you can tell: “SharePoint can do so much more than this!”

By

by

How to Perform Sharepoint Deployment by Features

Today I would like to talk about Features in Sharepoint. Features is a model provided by Sharepoint what reduces the complexity of deploying site customizations and at the same time provides to the team a strong and consistent way to perform many deployments as necessary following a well-known and documented process.
By wrapping up content deployment in Features, you are also likely to implement versioning control since each package can be labeled by version.

How to Implement a Sharepoint Feature?
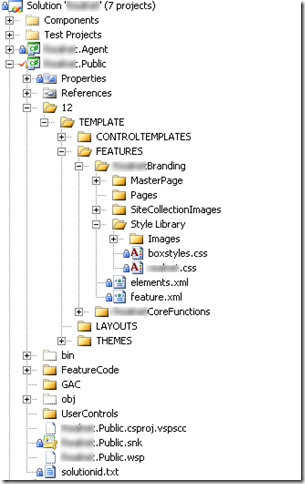
Let’s assume you are using Microsoft Visual Studio.NET. To implement a Feature, you should mimic the current Sharepoint file Path in your solution. Go ahead and create a path called <yoursolution>\12\TEMPLATE\FEATURES

sharepoint-feature-deployment

There you will place all the necessary content for the Feature. We will use WSPBuilder as a preferred tool to ease our task as well. If you don’t have WSPBuilder you can get it from our tools page.
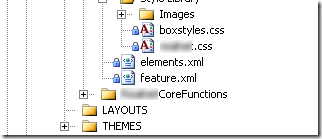
You will see a file called Feature.XML, this file will tell you the location of the assemblies, files, references, resources etc included in your Feature deployment. The xml file also will allow you specify a friendly name for your feature. like: MySiteBrandingContenttell , for example.

sharepoint-feature-deployment (2)

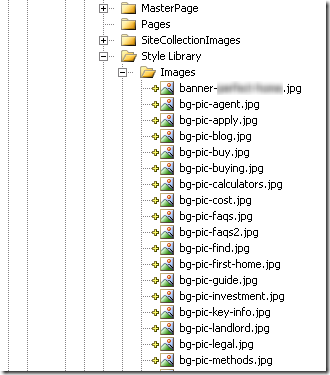
Now let’s say you want to add a whole bunch of images to your site. Just go to the Style Library/Images folder and add them there. Remember, our folder structure is mirroring the actual Sharepoint folder structure.

sharepoint-feature-deployment (1)
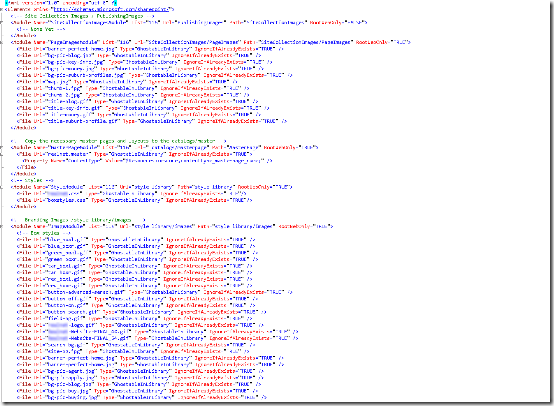
Now let’s take a look at the elements.xml file.
sharepoint-feature-deployment (3)
Note the section called ImageModule pointing to the url style library/Images.
This section will ultimately tell Sharepoint (via WSPBuilder) all the files that must be present inside your Feature package. So you should go and edit this file, adding all the images you want to distribute with your Feature.
That’s an OK process, but often we have dozens if not hundreds of images to deploy. So here’s a nice trick to quickly populate the section.
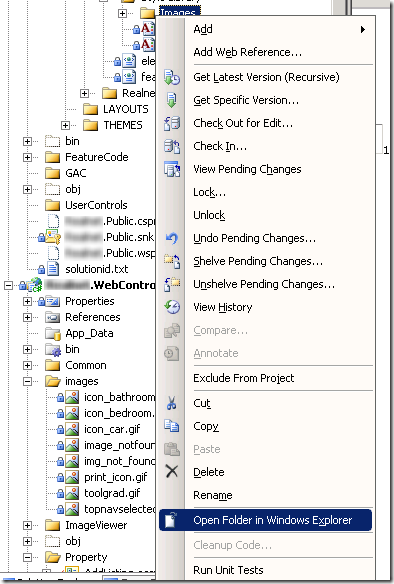
First you open via windows explorer the location where all the images are located.
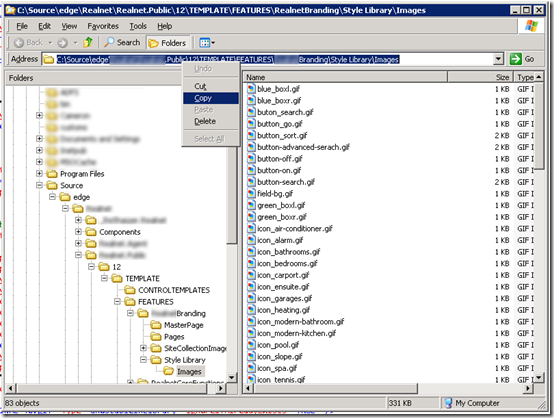
sharepoint-feature-deployment (4)
Get the folder path, which depending of your solution can be quite big.
sharepoint-feature-deployment (5)
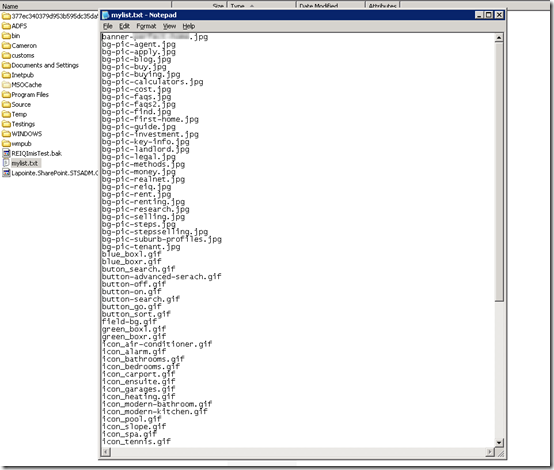
Make a list of all the files you want to add to the xml section into a text file. And here comes again another trick, from the good-old-days of DOS. The command below will list all the files, just the names and save it into a file in your computer.
sharepoint-feature-deployment (6)
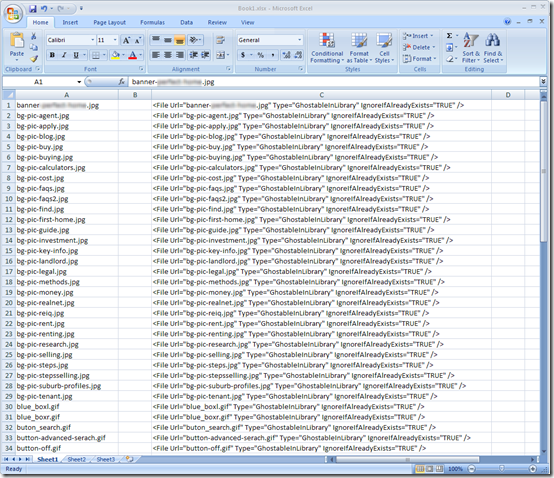
Open this file, select all the files and copy to an Excel spreadsheet (or any other similar toll like the OpenOffice Calc)
sharepoint-feature-deployment (7)
sharepoint-feature-deployment (8)
Now, another trick. Use this formula within your spreadsheet. This when applied to the content will format the whole document perfectly for use inside your XML feature file.
ScreenShot001
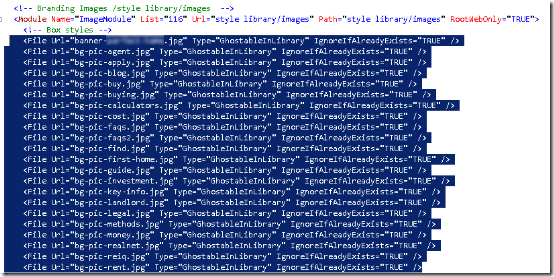
Now you just have to copy the content generated and copy/paste into your section.
sharepoint-feature-deployment (9)
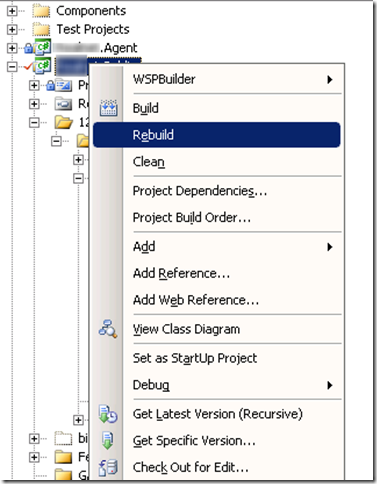
Right-click your solution and rebuild the project.
sharepoint-feature-deployment (10)

Voila! You’re ready to deploy your feature.
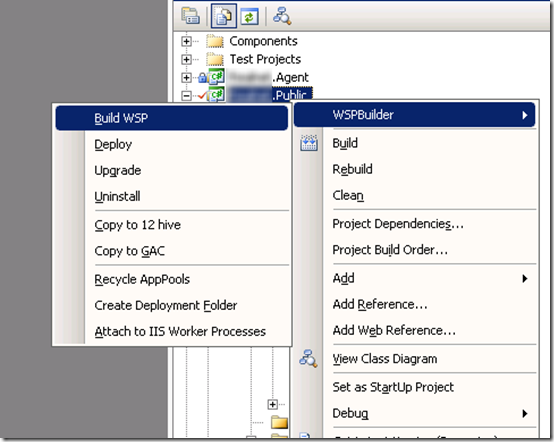
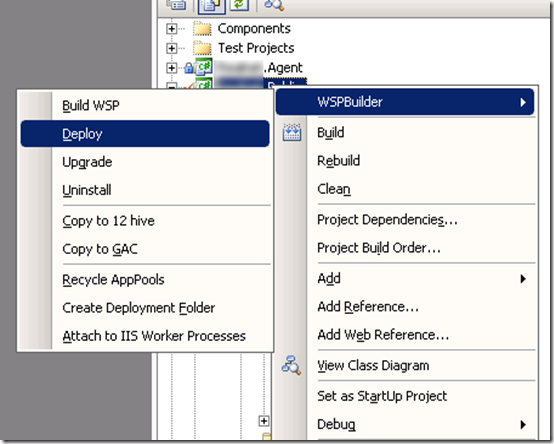
Now comes the part when WSPBuilder is really handy. If you have it installed in your computer you will notice the context-sensitive menu integrated within your Visual Studio environment.  Right-click again your solution and choose Build WSP
sharepoint-feature-deployment (11)
If everything went as expected, right-click again and then choose Deploy. This will effectively deploy the solution to your environment.
How Does WSPBuilder knows where my Sharepoint Site is? It will pick it up from the project properties/URL path.
In any case, the package will be created under your solution/bin/deploy folder. A batch file called deploy with stsadmn is also going to be created if you decide to deploy it manually without having to remember all the stsadmin –o directives for it, or if you want to take the Feature package to another server.

sharepoint-feature-deployment (12)

Now go you your website and see all the changes applied. Your feature should have been deployed successfully!
 
Why I can not see my deployed features?
That’s because you need to disable the feature and then re-enabled it again to see it in action. By doing this you are forcing the files to be copied over to the actual Sharepoint site.
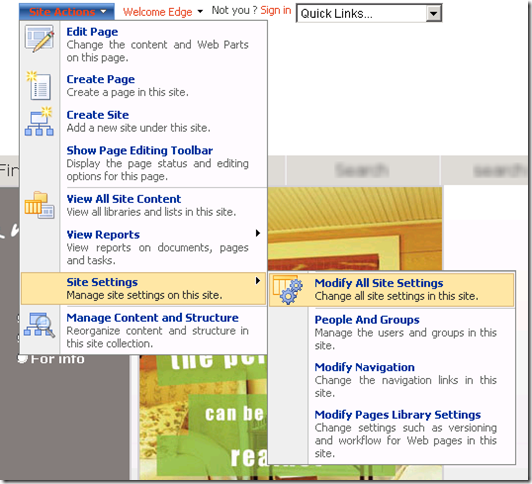
You do this. Go to modify all your site settings:

sharepoint-feature-deployment (13)

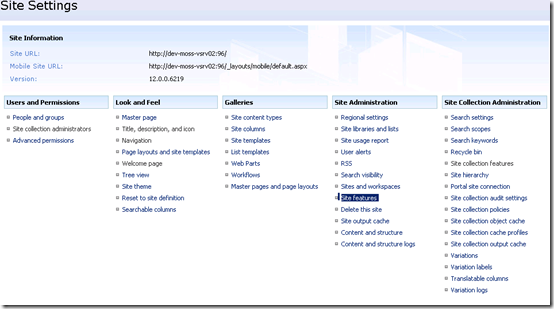
Go to the site features, where you can see all the listed features in your site.

sharepoint-feature-deployment (14)
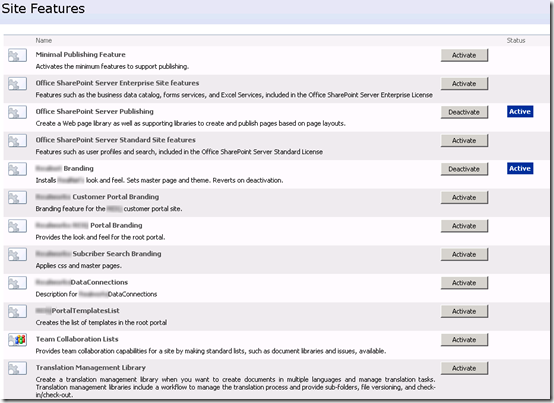
Then manually deactivate and activate the feature.

sharepoint-feature-deployment (15)
There you go! Your feature is got to be there now.

By