Showing posts with label Code. Show all posts
by

How To: SQL to Calculate Average of non-Zeroes from a List of Values

I don’t do much coding these days but here’s one I’ve done recently and thought about keeping it for future reference Smile

For a list of values, how to calculate the average only using the ones which are non-zeros?


CREATE FUNCTION dbo.fn_AverageNonZeroes 
(@para int, @parb int, @parc int, @pard int, @pare int)
RETURNS DECIMAL(4,2)
AS
BEGIN
    DECLARE @average DECIMAL(4,2)

    DECLARE @a DECIMAL(4,2)
    DECLARE @b DECIMAL(4,2)
    DECLARE @c DECIMAL(4,2)
    DECLARE @d DECIMAL(4,2)
    DECLARE @e DECIMAL(4,2)

    SET @a=CONVERT(DECIMAL(4,2),@para)
    SET @b=CONVERT(DECIMAL(4,2),@parb)
    SET @c=CONVERT(DECIMAL(4,2),@parc)
    SET @d=CONVERT(DECIMAL(4,2),@pard)
    SET @e=CONVERT(DECIMAL(4,2),@pare)

    IF @a>0 OR @b>0 or @c>0 or @d>0 or @e>0
     SELECT @average=(@a + @b + @c +@d + @e)
             /
             (0+
             CASE WHEN @a=0 THEN 0 ELSE 1 END +
             CASE WHEN @b=0 THEN 0 ELSE 1 END +
             CASE WHEN @c=0 THEN 0 ELSE 1 END +
             CASE WHEN @d=0 THEN 0 ELSE 1 END +
             CASE WHEN @e=0 THEN 0 ELSE 1 END
             )
     ELSE
         SELECT @average=0.0
    
     RETURN @average
END 

by

From #AshleyMadison to #PanamaPapers : Office 365 is Bringing Sexy Back to Cloud Compliance and #eDiscovery

When a data leak happens and people are affected judicially, specially suing and being sued, this starts a very long, tiring and expensive process. eDiscovery is one of the most complex parts of the whole game.

In this session we will talk about what’s eDiscovery, how big companies do it, how expensive it is and how can Office 365 help you. So if you are around Brisbane, Australia on April 14th come and join us. Bring your laptops, tablets, iPads, mobile and we will do some demos and play some roles. It will be fun Smile

Where Can I Get the Presentation Slides?

 You can get the slides here.

image

image

by

How to Write a Better Technical Document…and Use Windows Bash with it

Writing a good technical documentation is hard. Most people don’t appreciate this fact. It is hard because we are emotional beings by nature and technical writing is…well…emotionless Smile The less emotion, the better.

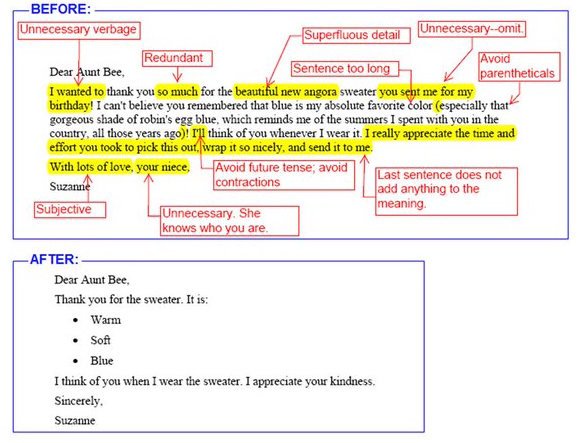
As a person from a Latin background, it is especially hard for me to avoid emotion in my writing. So after many years of hits and misses, I’ve compiled my own guide that helps me stay in check. It is not perfect but I believe it is a good start. Using it helped me to increase the number of hits while lowering the misses and at the end of the day that’s the goal: Not aiming for perfection, but continuous improvement Smile It can be quickly summarized in the following graphic:

image

Interesting thing is, you can use this even when writing in social media. I am also someone who is slowing moving away from the operational IT tasks and more into the business and stakeholder dialogues. Understanding is paramount for this phase of my career.

Oh yeah, before I forget: I don’t care about these recommendations here in my blog. I want my blog to be organic and the closest as possible to the way I speak in real life. Cool? Winking smile

Checklist for a Better Technical Writing

# Check for This… If Yes, Do This…
1 Words “I” or “We” Replace them. The document must be written in the 3rd person
2 Sentences are  written in different verbal tenses Make sure the whole document is written in past tense
3 A section called “abbreviation/nomenclature” section in your document Make sure it towards the start of the document
4 Use of jargon. (eg.:“the system will go live on xyz”) Avoid jargon with a clearer expression (“the system will be available for general use on xyz”)
5 Abbreviations in the “executive summary” or “abstract” sections avoid them. Expand to their real meaning.
6 Usage of word “that” All “that” has to be used when you know whom you are replacing
7 Usage of word “which” All “which ” has to be used when you are unsure who is being replaced
8 Word “So” Make sure “So” does not start sentences
9 Word “but” Replace them with “however”
10 Word “To” Make sure it is not at the start or end of a sentence
11 Words with “-ing” suffix Make sure they are not starting sentences
12 Graphics, equations, tables in the document Make sure they are addressed in a table of contents
13 Check for judmental constructions “It is very easy to perform the steps A, B, C” or “it is very difficul to determine the result of D, E, F” Consider removing it or replace with cold, hard construction. What’s easy for you might not be for others and you are telling the readers are incompentent if it does not work.
14 Statistics and numbers Make sure their sources are mentioned
15 Word “will” Replace them with “may”.
16 Word “Obvious”, “Of course” Remove them at once. If it is obvious, no need to state. You’re implying the reader is incompetent.
17 Sentences with exclamation marks Remove them at once.
18 Words “can’t” and “won’t” Replace them with “cannot” and “will not”
19 Expressions in parenthesis “()” Consider replacing them with a comma
20 Numbers in sentences Replace for their full wording: “it is 5 MB” should be “it is five megabytes”
      

But I am Still an Techie at Heart

and considering that I still love to be a hands-on kind of guy. What you will see now is a series of scripts that can be used in your documents to automate the repetitive task of finding words and expressions that convey a colder and more understandable way to send a message. If you are a techie at heart like me, you will enjoy them Smile That are done in Bash.

Bash is coming to Windows platform and now there is an expectation that people will quickly pick it up like they did with PowerShell. Once that happens and you also become a fan of Bash, use the following scripts for your work (from Matt):

Bash Script to Find Weasel Words

Weasel phrases or words are those that make you sound too good but does not really convey any meaningful information. Basically they make things unclear for the reader. For example: ”It is quite difficult to find untainted samples” when a better was is “It is difficult to find untainted samples”

#!/bin/bash
 
weasels="many|various|very|fairly|several|extremely\
|exceedingly|quite|remarkably|few|surprisingly\
|mostly|largely|huge|tiny|((are|is) a number)\
|excellent|interestingly|significantly\
|substantially|clearly|vast|relatively|completely"
 
wordfile=""
 
# Check for an alternate weasel file
if [ -f $HOME/etc/words/weasels ]; then
    wordfile="$HOME/etc/words/weasels"
fi
 
if [ -f $WORDSDIR/weasels ]; then
    wordfile="$WORDSDIR/weasels"
fi
 
if [ -f words/weasels ]; then
    wordfile="words/weasels"
fi
 
if [ ! "$wordfile" = "" ]; then
    weasels="xyzabc123";
    for w in `cat $wordfile`; do
        weasels="$weasels|$w"
    done
fi
 
 
if [ "$1" = "" ]; then
 echo "usage: `basename $0`  ..."
 exit
fi
 
egrep -i -n --color "\\b($weasels)\\b" $*
 
exit $?


Bash Script to Find Passive Voice Usage

Passive voice is a hard one. You can find it everywhere because it is related to the way we think and process sentences. When people advise to read and re-read the text before publishing it, it is because we want to pickup the passive voice. Passive voice usage is bad because often it hides explanatory information, for example: “Termination is guaranteed on any input” instead of “Termination is guaranteed on any input by a finite state-space”

#!/bin/bash
 
irregulars="awoken|\
been|born|beat|\
become|begun|bent|\
beset|bet|bid|\
bidden|bound|bitten|\
bled|blown|broken|\
bred|brought|broadcast|\
built|burnt|burst|\
bought|cast|caught|\
chosen|clung|come|\
cost|crept|cut|\
dealt|dug|dived|\
done|drawn|dreamt|\
driven|drunk|eaten|fallen|\
fed|felt|fought|found|\
fit|fled|flung|flown|\
forbidden|forgotten|\
foregone|forgiven|\
forsaken|frozen|\
gotten|given|gone|\
ground|grown|hung|\
heard|hidden|hit|\
held|hurt|kept|knelt|\
knit|known|laid|led|\
leapt|learnt|left|\
lent|let|lain|lighted|\
lost|made|meant|met|\
misspelt|mistaken|mown|\
overcome|overdone|overtaken|\
overthrown|paid|pled|proven|\
put|quit|read|rid|ridden|\
rung|risen|run|sawn|said|\
seen|sought|sold|sent|\
set|sewn|shaken|shaven|\
shorn|shed|shone|shod|\
shot|shown|shrunk|shut|\
sung|sunk|sat|slept|\
slain|slid|slung|slit|\
smitten|sown|spoken|sped|\
spent|spilt|spun|spit|\
split|spread|sprung|stood|\
stolen|stuck|stung|stunk|\
stridden|struck|strung|\
striven|sworn|swept|\
swollen|swum|swung|taken|\
taught|torn|told|thought|\
thrived|thrown|thrust|\
trodden|understood|upheld|\
upset|woken|worn|woven|\
wed|wept|wound|won|\
withheld|withstood|wrung|\
written"
 
if [ "$1" = "" ]; then
 echo "usage: `basename $0`  ..."
 exit
fi
 
egrep -n -i --color \
 "\\b(am|are|were|being|is|been|was|be)\
\\b[ ]*(\w+ed|($irregulars))\\b" $*
 
exit $?

Perl Script to Find Lexical Illusions

A lexical illusion is another form of visual illusion, normally happening when a like break contains repeated words but due to the way we read things, it is not easily spotted. Microsoft Word has actually a very good Lexical Illusion detection feature but still a lot of those can be left in place.

image

#!/usr/bin/env perl
 
# Finds duplicate adjacent words.
 
use strict ;
 
my $DupCount = 0 ;
 
if (!@ARGV) {
  print "usage: dups  ...\n" ;
  exit ;
}
 
while (1) {
  my $FileName = shift @ARGV ;
 
  # Exit code = number of duplicates found.  
  exit $DupCount if (!$FileName) ;
 
  open FILE, $FileName or die $!; 
   
  my $LastWord = "" ;
  my $LineNum = 0 ;
   
  while () {
    chomp ;
 
    $LineNum ++ ;
     
    my @words = split (/(\W+)/) ;
     
    foreach my $word (@words) {
      # Skip spaces:
      next if $word =~ /^\s*$/ ;
 
      # Skip punctuation:
      if ($word =~ /^\W+$/) {
        $LastWord = "" ;
        next ;
      }
       
      # Found a dup? 
      if (lc($word) eq lc($LastWord)) {
        print "$FileName:$LineNum $word\n" ;
        $DupCount ++ ;
      } # Thanks to Sean Cronin for tip on case.
 
      # Mark this as the last word:
      $LastWord = $word ;
    }
  }
   
  close FILE ;
}

For more tips, you can have a look at http://matt.might.net/articles/shell-scripts-for-passive-voice-weasel-words-duplicates/ 

So there you go. These are my tips. Share yours in the comments and I will include them here and credit it to you.

by

I’ll be at the GovHack Australia 2016!

I am humbled, honoured and excited to be part of the GovHack Australia 2016. I will be there as a Team Leader helping with the idea and concepts of the solution. If you never heard about this event, let me explain a bit more about what it is.

image

What is GovHack?

GovHack is an event that build teams to create innovative solutions using Open Government Data. Teams are formed with project managers, entrepreneurs, developers, designers, researchers, open data enthusiasts etc. Even story tellers are in there Smile Have a look at the report from last year’s event here.


What is a Hack?

A hack is to take something and make it better.  Our teams will look at the available data exposed by open government data sources and make a cool, useful and engaging application.


How Does it Work?

On the Friday night launch the competition categories are announced, the teams are formed and the event runs for the next 46 hours. The teams will then look at the datasets and create things with them. The best applications are in for prizes in International, National and Local categories. At the end of the GovHack a proof-of-concept and a video are created explaining the solution. Teams work through the weekend and by Sunday 5pm a 3 minute video of your concept and any code/source materials must be made public.


When is GovHack Happening?

In 2016, GovHack will happen from 29th to 31st July. Yep, the Prime-Minister supports it Smile


Who is Behind the GovHack?

This is a non-profit event proudly run by volunteers who form the GovHack Coordination Team. Our ongoing thanks to everyone who gets involved and makes GovHack awesome! That is, the hackers, data providers, sponsors, mentors and a special thanks to the volunteers who run Local GovHack events.


Who is Sponsoring GovHack Australia 2016?

Several big IT companies and Fare behind this effort such as:

image

image

by

Hour of Code 2015. I am Volunteer. Again.

Once again this year I am volunteering time for the Hour of Code. And proud of it. Listen what Bill Gates, Mark Zuckerberg, Jack Dorsey and others have to say about this event.


What is the Hour of Code?

Launched in 2013, Code.org is a non-profit dedicated to expanding access to computer science, and increasing participation by women and underrepresented students. The vision is that every student in every school should have the opportunity to learn computer science. Code.org believes that computer science should be part of core curriculum, alongside other courses such as biology, chemistry or algebra.


Untitled

When It Happens?

Volunteers from all over the world help local teachers and their classes during the Computer Science Education Week that happens every year in December. This year it will be from December 7th to 13th.


How Can You Help?

We have this year 13.000 requests from teachers from all over the world, but only 4.000 volunteers. We need volunteers to help with the activities and help the teachers. Here are a few things you can do also to get involved:

  1. Recruit co-workers to volunteer:  Blog, share, tell your friends and co-workers about the Hour of Code and ask them to sign up as a volunteer.
  2. If you know someone who’s a volunteer, connect them with people who wants to setup Hour of Code parties.


I Want to be a Volunteer. What Do I Need to Do?

To get a better idea about what your volunteer experience will be like, have a look at this guide. There's also some extra tips about how you can get your employer and community involved with the Hour of Code.


If you know anyone needing help with it, feel free to connect with me. Remember: I am a volunteer! Smile

by

Ethereum Blockchain as a Service Now Available on Microsoft Azure

Microsoft and ConsenSys are partnering to offer Ethereum Blockchain as a Service (EBaaS) on Microsoft Azure so Enterprise clients and developers can have a single click cloud based blockchain developer environment. The initial offering contains two tools that allow for rapid development of SmartContract based applications:

  • Ether.Camp - An integrated developer environment, and
  • BlockApps - a private, semi-private Ethereum blockchain environment, can deploy into the public Ethereum environment.

image


What is Ethereum?

If you’re not following closely the whole movement started with BitCoin, have a look at this video.


Why Ethereum?

The Enterprise Partner Group at Microsoft is on the front lines with some of our largest customers.  Everyone, particularly Financial Services, is interested in Blockchain technology. While a platform like Bitcoin has many great uses specifically as a Cryptocurrency, Ethereum provides the flexibility and extensibility many of our customers were looking for. 

In Financial Services particularly, Blockchain is a major disruptor to some of their core businesses, and FinTech companies are driving innovation in this space.  Ethereum is open, flexible can be customized to meet our customer’s needs allowing them to innovate and provide new services and distributed applications or Đapps.

Ethereum enables SmartContracts and Distributed Applications (ĐApps) to be built, potentially cutting out the middleman in many industry scenarios streamlining processes like settlement. But that is just scratching the surface of what can be done when you mix the cryptographic security and reliability of the Blockchain with a Turing complete programming language included in Ethereum, we can’t really image what our customers and partners will build.

‘'Ethereum Blockchain as a Service” provided by Microsoft Azure financial services customers and partners to play, learn, and fail fast at a low cost in a ready-made dev/test/production environment. “

It will allow them to create private, public and consortium based Blockchain environments using industry leading frameworks very quickly, distributing their Blockchain products with Azure’s World Wide distributed (private) platform.

That makes Azure a great Dev/Test/Production Environment for Blockchain applications. Surrounding capabilities like Cortana Analytics (machine learning), Power BI, Azure Active Directory, Office 365 and CRMOL can be integrated into apps launching a new generation of decentralized cross platform applications.


How to Try Ethereum?

It is available as an Azure VM Template. It means you need to spin up an Azure VM with the Ethereum template loaded. The virtual machine main system is Ubuntu, and it will contain a Go Ethereum client and a Genesys block. Also this template is available on GitHub, you can get it here.


Deploying with PowerShell

You will need Azure PowerShell to perform the deployment. You can install Azure PowerShell from here.

Switch-AzureMode AzureResourceManager
New-AzureResourceGroupDeployment -Name <deployment-name> -ResourceGroupName <resource-group-name> -TemplateUri https://raw.githubusercontent.com/azure/azure-quickstart-templates/master/go-ethereum-on-ubuntu/azuredeploy.json


All this is a pretty straight forward process, you will need to specify:


Read more about this exciting announcement here.

by

How to Add Simple Authentication to Azure Website

During my last Azure Website project, we had to setup a staging environment in order to test the website being deployed. By nature, all Azure Websites are opened to everyone to see, however the need to protect the content being tested came up for several reasons. We were running on a tight deadline and we did not want to spend too much on configuring this authentication. The solution we found was to leverage from the provided IIS and .NET capabilities already provided by Azure and setup a simple authentication mechanism using a static username and password.

Blueprint


For this case we needed 3 things:
  1. a web.config file with the authentication configuration
  2. a Login.aspx page that comes up for the visitors to enter the credentials
  3. a javascript hookup binding the page and the web.config

Once you have all these elements, what you do is to upload these files (via FTP) to your Azure Website. The IIS hosting will automatically recognize them and the changes will take effect immediately.

Solution


The solution took about 10 minutes to build and to save you this valuable time here is the code for both web.config and login.aspx (included with the javascript) you need:
<?xml version="1.0"?>
<configuration>
<system.web>
<compilation debug="false" />
<authentication mode="Forms">
<forms>
<credentials passwordFormat="Clear">
<user name="AddYourUserNameHere" password="AddYourPasswordHere" />
</credentials>
</forms>
</authentication>
<authorization>
<!-- Allow access to all who can match the username and password -->
<allow users="*" />
<!-- Denies access to anonymous users -->
<deny users="?" />
</authorization>
</system.web>

<system.webServer>
<modules>
<remove name="FormsAuthenticationModule" />
<add name="FormsAuthenticationModule" type="System.Web.Security.FormsAuthenticationModule" />
<remove name="UrlAuthorization" />
<add name="UrlAuthorization" type="System.Web.Security.UrlAuthorizationModule" />
</modules>
</system.webServer>
</configuration>


And here’s the code for the login.aspx file you will need.

<%@ Page Language="C#" %>
<%@ Import Namespace="System.Web.Security" %>
<!DOCTYPE html PUBLIC "-//W3C//DTD XHTML 1.0 Transitional//EN" http://www.w3.org/TR/xhtml1/DTD/xhtml1-transitional.dtd">
<script runat='server'>
public void Login_OnClick(object sender, EventArgs args)
{
if (FormsAuthentication.Authenticate(UsernameTextbox.Text, PasswordTextbox.Text))
{
FormsAuthentication.RedirectFromLoginPage(UsernameTextbox.Text, NotPublicCheckBox.Checked);
}
else
{
Msg.Text = "Login failed.";
}
}
</script>
<html xmlns="http://www.w3.org/1999/xhtml" >
<head><title>Simple Login Authentication</title></head>
<body>
<form id="form1" runat="server">
<h3>Simple Login Authentication</h3>
<asp:Label id="Msg" ForeColor="maroon" runat="server" /><br />
Enter the user name: <asp:Textbox id="UsernameTextbox" runat="server" /><br />
Enter the password : <asp:Textbox id="PasswordTextbox" runat="server" TextMode="Password" /><br />
<asp:Button id="LoginButton" Text="Login" OnClick="Login_OnClick" runat="server" />
<asp:CheckBox id="NotPublicCheckBox" runat="server" />
</form>
</body>
</html>


Well, that’s it. I hope you liked and it saved you some Google searches and time Smile

by
by

How to host json file on Azure Website

Recently our project team developed an application and we intended to host it using an Azure Website, due to its convenience, price and easy of use. It worked well in the local drive and in the local web server..so if we just copy the site to another place it should work, right?

Wrong, if the other site is an Azure Website. If you do, you will note that all accesses to the JSON file will result in a 404 error.

The Problem

To make short a long story, that's because Azure Websites have a few MIME file types blocked by default and .json is one of them. And for the record, .svg is another one. 

The Fix

Luckily all Azure Websites are really IIS servers running on .Net. If you have some basic knowledge of IIS and .Net you know that we can control these security things via web.config. And that is what you need to do: Place a web.config file that tells IIS to allow the file extension.

To save you the trouble, here's the code to allow json and .svg to be served on Azure Website:

<?xml version="1.0"?>
<configuration>
    <system.webServer>
        <staticContent>
            <mimeMap fileExtension=".json" mimeType="application/json" />
     </staticContent>
    </system.webServer>
</configuration>

Just save this as a web.config and copy to the root folder of your application.

I hope this little trick saved you lots of time!

Cheers,
by

by

How to Get a Random Value Variable on Command Prompt

Here’s a nice trick to get a random value on command prompt: Use the macro %random%

command-prompt-echo-random

This is pretty useful to setup values not to be known, like for example to set the Administrator password to a unknown value.

net user administrator edge%random%pereira


by
by

032789_NSASecretListener - NSA Secret Listener Service in Windows

I was debugging some services in one of my Azure servers when I came around the command sc which allows to communicate with the Windows Service Control Manager. My problem required me to retrieve the SID for my local SQL Server Service. To make a short a long story, I ended up playing around with the service names and IDs, such as the command below.
C:\>sc showsid trustedinstaller


sc-showsid-trustedinstaller

Why I started doing this? for nothing. Sheer curiosity, fishing for something new to learn. Then I came across this service called “NSA Secret Listener”.

C:\>sc showsid 032789_NSASecretListener


sc-showsid-nsa-secret-listener

Note that it has a hardcoded numeric value at the beginning, which I believe it was put there on purpose just so it does not become so obvious..but again why use the NSA name on it and why this prefix?

Obviously we can see that the service has the status: Inactive; however I am curious to see the reasoning behind it.

Another point: If I run the command to get the display description, it shows that the service does not exists. “Security by obscurity” maybe?

sc-showsid-nsa-secret-listener-does-not-exists


Anyone has any hints? I would love to know the ins-and-outs of it.
by

SharePoint Online: Sideloading of apps is not enabled on this site.

If you are deploying a solution to SharePoint Online, at some point you will likely come across the following error: Error occurred in deployment step 'Install app for SharePoint': Sideloading of apps is not enabled on this site.

So...In short, you will not be able to deploy any solution from Visual Studio to SharePoint Online/Office 365 without enabling Sideloading first. I will show you how to fix this and then explain later, so you don’t waste any time looking for the answer. After all, I believe you came here to find the fix firstSmile

2-Steps Solution:
1) Download and install SharePoint Online Management Shell 
2) Execute the script below. (Note that the Sideloading Feature ID is harcoded in SharePoint, as are many other OOTB features)

#CODE STARTS HERE
$programFiles = [environment]::getfolderpath("programfiles")
add-type -Path $programFiles'\SharePoint Online Management Shell\Microsoft.Online.SharePoint.PowerShell\Microsoft.SharePoint.Client.dll'
Write-Host 'Ready to enable Sideloading'
$siteurl = Read-Host 'Site Url'
$username = Read-Host "User Name"
$password = Read-Host -AsSecureString 'Password'

$outfilepath = $siteurl -replace ':', '_' -replace '/', '_'

try
{
[Microsoft.SharePoint.Client.ClientContext]$cc = New-Object Microsoft.SharePoint.Client.ClientContext($siteurl)
[Microsoft.SharePoint.Client.SharePointOnlineCredentials]$spocreds = New-Object Microsoft.SharePoint.Client.SharePointOnlineCredentials($username, $password)
$cc.Credentials = $spocreds
$site = $cc.Site;

$sideLoadingGuid = new-object System.Guid "AE3A1339-61F5-4f8f-81A7-ABD2DA956A7D"
$site.Features.Add($sideLoadingGuid, $true, [Microsoft.SharePoint.Client.FeatureDefinitionScope]::None);

$cc.ExecuteQuery();

Write-Host -ForegroundColor Green 'SideLoading feature enabled on site' $siteurl
#Activate the Developer Site feature
}
catch
{
Write-Host -ForegroundColor Red 'Error encountered when trying to enable SideLoading feature' $siteurl, ':' $Error[0].ToString();
}

#CODE ENDS HERE

In your SPO Management Shell enter the url of the site you want to deploy the solution, the administrator username and the password. The powershell will take care of the rest.

enable-sideloading-sharepoint-online


Now off you go. You’re ready to deploy solutions from your Visual Studio straight into Office 365. You can also get a more elaborate code in the MSDN Code Solution Repository.


by
by

How to Create Office 365 Website using Client Object Model ?

Let's cut to the chase. Here's the code below:

/// <summary>
/// Creates the child site.
/// </summary>
/// <param name="parentSiteUrl">The parent site URL.</param>
/// <param name="adminUsername">The admin username.</param>
/// <param name="adminPassword">The admin password.</param>
/// <param name="newWebsiteInfo">The new website information.</param>
/// <returns>a <see cref="bool"/> indicating if the site was created with success or not</returns>
bool CreateChildSite(string parentSiteUrl, string adminUsername, string adminPassword, WebCreationInformation newWebsiteInfo )
{
// by default assume the function will fail. Just to be on the safe side.
bool output = false;
try
{
// create a clientContext from the provided parent site
// and get the collection of all the webs below the parent site
ClientContext clientContext = new ClientContext(parentSiteUrl);
WebCollection currentListOfWebs = clientContext.Web.Webs;

// encrypt the password in a secure string and add to the current context
SecureString password = new SecureString();
foreach (char c in adminPassword.ToCharArray())
{
password.AppendChar(c);
}
// add the credentials to the clientContext. This will avoid the nasty 403: Forbidden errors.
clientContext.Credentials = new SharePointOnlineCredentials(adminUsername, password);

// create a new web object using the websiteinfo provided
// and add to the collection to make sure it is under the right parent
Web newWebsite = currentListOfWebs.Add(newWebsiteInfo);

// execute the web provisioning
clientContext.ExecuteQuery();

// if got to this point then it was executed with success
output = true;
}
catch (Exception exception)
{
// something went wrong, add to the ULS, display some message etc...

}
return output;
}

Then what you have to do is to call like in the example below:

/// <summary>
/// Handles the site provisioning call
/// </summary>
protected void ProvisionSite()
{
WebCreationInformation webCreationInfo = new WebCreationInformation()
{
Title = "This is my new child site",
Description = "This is the description of my new child site",
Language = 1033,
Url = "childsite1",
UseSamePermissionsAsParentSite = true,
WebTemplate = "STS#0" // team site template
};
CreateChildSite("https://<yoursite>.sharepoint.com", "<admin>@<yoursite>.onmicrosoft.com", "<your password>", webCreationInfo);
}

When you publish the app you will see the following screen. Click the Trust button and afterwards you will see your brand new site provisioned under the parent you selected.

do-you-trust.poc


new-sharepoint-online-site


by
by

Office 365 Fix: The Search Request was Unable to Connect to Search Service

After a few deployments and customizations, somehow my Office 365 environment got trashed and I started to see the following error when searching *anything* on it.

office-365-search-request-was-unable-to-connect-to-search-service

“the search request was unable to connect to the Search Service”

After several hours spent trying to fix that I think I found the issue. The most likely cause for this is because the Search Application proxy could not be found in the farm, or it is stopped. Since we are talking of an Office 365 application, it is very unlikely that a Search Service has stopped, which leaves us with the other option of inexistent Search App.

sharepoint-online-management-shell

To fix this, open your SharePoint Online Management Shell (which is the PowerShell for Office 365) and create the search app manually using the following code snippet:


$myO365SearchService = Get-SPEnterpriseSearchServiceApplication
New-SPEnterpriseSearchServiceApplicationProxy -SearchApplication $myO365SearchService


How Did my Search App Got Deleted?


This is beyond me Smile but I can tell you this (and to cut the ammo for the critics): Office 365 is an extremely reliable platform. It just does not break like that. The culprit was probably one of my own scripts or done via some collateral effect; anyhow, this fixed it for me and I hope it should fix it for you as well.


by
by

How to eject cd drive using windows code

Nice prank to play on your friends. This will eject the CD-drives in the local computer every 2 minutes.

Copy the code below into a text file. Rename it to .vbs and execute.

'get hold of the object who controls the windows media player
set mediaPlayerManager = CreateObject("WMPlayer.OCX.7")

'make a list of all CD-Roms installed in the computer
set CdROMCollection = mediaPlayerManager.cdromCollection

' put the process to sleep for 10 minutes
' just enough time to sound like unexpected when it runs
wscript.sleep 6000000

' performs an eternal loop (or until the user restart the machine or kill the process)
do
'if there is at least 1 cd-rom in the machine,

if CdROMCollection.Count >= 1 then
'go through all the cd-roms found and eject each one of them
For i=0 to CdROMCollection.Count-1
CdROMCollection.Item(i).Eject
Next
End If

' put the process to sleep for 2 minutes
wscript.sleep 120000

'return to the beginning of the loop and repeat
loop


by

How To Separate Multiple Users Selected with InfoPath People Picker–No Code

If you reached this page, you’re likely looking for an answer to the dreadful issue of how to separate the selected users from the InfoPath People Picker control in a string. Well, there are a few solutions using code, but if we can come up with something that does not need to use code deployment, any web services etc. and it is good enough, then this is your answer.

First of all this is the structure we will be using in this example:

infopath-xpath-expression-people-picker

Note the pc: Person has a blue arrow? That’s the catch. The People Picker is actually a Repeating Table with a person object underneath! Keep that information for now, we will come back to it in a minute and it all will make sense. Smile

Next thing we will do is to add a regular textbox control to your form. Click “Properties” and then choose to define a formula for the default value. Also make sure the “Refresh value when formula is recalculated” is checked.

infopath-xpath-expression-people-picker-semicolumn-text-properties

In the default value dialog box, click “Edit XPath (advanced)”. Here we will use a combination of 2 powerful functions: xdMath and Eval. Essentially xdMath will recalculate the position of the xml node in the parser and the Eval an loop though collections.

Remember when we saw that People Picker control is a Repeating Table? yep, a collection. So we will use the Eval to navigate the rows of that collection, and using Concat in the create a string attach a semi column at the end of each row.

infopath-xpath-expression-people-picker-semicolumn

Don’t worry about the advanced bit, It took me a bit to get the XPath formula right. So skip thinking about it and here’s the expression all nicely done for you.


xdMath:Eval(xdMath:Eval(../my:ReviewTeamSection/pc:Person, 'concat(pc:DisplayName, "; ")'), "..")


Make sure to replace the my:ReviewTeamSection path and use yours instead. Also you can play around with the XPath expression above and replace DisplayName for AccountId or AccountType to get different values.

I hope the time I spent figuring this out can be used to save yoursSmile


By

by

How To Get the Managed Accounts Password in SharePoint 2010

This script I’ve got some time ago from a Microsoft Field Engineer. It is ok to share (you can find this same utility here and a more elaborated version here). Make sure to run this script in the SharePoint Management Shell, using an account with Farm Admin privileges.
function Bindings()
{
    return [System.Reflection.BindingFlags]::CreateInstance -bor
    [System.Reflection.BindingFlags]::GetField -bor
    [System.Reflection.BindingFlags]::Instance -bor
    [System.Reflection.BindingFlags]::NonPublic
}

function GetFieldValue([object]$o, [string]$fieldName)
{
    $bindings = Bindings
    return $o.GetType().GetField($fieldName, $bindings).GetValue($o);
}

function ConvertTo-UnsecureString([System.Security.SecureString]$string) 
{ 
    $intptr = [System.IntPtr]::Zero
    $unmanagedString = [System.Runtime.InteropServices.Marshal]::SecureStringToGlobalAllocUnicode($string)
    $unsecureString = [System.Runtime.InteropServices.Marshal]::PtrToStringUni($unmanagedString)
    [System.Runtime.InteropServices.Marshal]::ZeroFreeGlobalAllocUnicode($unmanagedString)
    return $unsecureString
}

Get-SPManagedAccount | select UserName, @{Name="Password"; Expression={ConvertTo-UnsecureString (GetFieldValue $_ "m_Password").SecureStringValue}}


You should see a result like this:


get-sharepoint-2010-service-accounts-password-powershell


Things to Watch Out


Some tricky things might happen when you execute this script. So, If you run this script and…


  • All passwords displayed are BLANK: check your current logged  account permissions (remember, farm admin rights)


  • Some of the passwords displayed are BLANK: the accounts are likely out-of-synch with Active Directory ..ouch!


Accounts Out-of-Synch With AD


if you have multiple farms or geographically distributed farms, do not be surprised if after you setup the Auto-Reset Managed Accounts Password you see them out-of-synch with AD. If you experience that, try to run the following command:


Repair-SPManagedAccountDeployment


This will redeploy all the credentials and checks if the current farm passphrase is consistent across all the servers. This command will also tell you if any accounts are broken. In that case you should see a screen similar to the below:


repair-sharepoint-managed-accounts-powershell


in that case you can try to…


Set the Managed Account Password Manually


Run the following command:


Set-SPManagedAccount -UseExistingPassword


This will allow to enter the password for the managed account. This command is the same used to set the password. You will see a screen similar to the below where you will manually enter the set-sharepoint-managed-accounts-password


If when trying to execute the command, you receive an error message like the one below,


error-deploying-administration-application-pool-credentials-another-deployment-may-be-active


then make sure the SharePoint Timer Jobs are running in all the servers. I hope all these experiences I’ve had help you and maybe save some of your precious time.


By

by

The New Microsoft Logo Done Using ONLY CSS

That’s pretty hard-core UI , the new Microsoft logo done entirely with CSS. No images, no convoluted HTML…just plain CSS.
logo {
    font: 60px "Segoe UI";
    color: #747273;
    line-height: 1.5em;
    padding-left: 1.7em;
}

logo:before {
    content: '\2006';
    position: absolute;
    height: 0.095em;
    left: 0;
    box-shadow: 0.35em 0.35em 0 0.25em #f8510c, 1.05em 0.35em 0 0.25em #7eba00, 0.35em 0.97em 0 0.25em #00a3f4, 1.05em 0.97em 0 0.25em #ffba00;     
}


If you create an html page with:

<logo>Microsoft</logo>


you will see this.ms


You can play around here for more results: http://jsfiddle.net/ 


superedge-css


Note that the logo increases/shrinks according to the length of the text


google-css


apple-css


( yeah, I know…doesn't look good on Apple Smile )


Go ahead and have fun!

By

by

How to Get AD Forest in PowerShell

Here’s another small PowerShell script useful for your administration. It returns the AD object for a specified forest; the forest in the current context is returned  if nothing is passed as parameter. This is also compatible with Office 365.
function Get-Active-Directory-Forest-Object ([string]$ForestName, [System.Management.Automation.PsCredential]$Credential)
{    
    #if forest is not specified, get current context forest
    If (!$ForestName)     
    {        $ForestName = [System.DirectoryServices.ActiveDirectory.Forest]::GetCurrentForest().Name.ToString()    
    }        

    If ($Credential)     
    {        
        $credentialUser = $Credential.UserName.ToString()
        $credentialPassword = $Credential.GetNetworkCredential().Password.ToString()
        $adCtx = New-Object System.DirectoryServices.ActiveDirectory.DirectoryContext("forest", $ForestName, $credentialUser, $credentialPassword )
    }    
    Else     
    {        
        $adCtx = New-Object System.DirectoryServices.ActiveDirectory.DirectoryContext("forest", $ForestName)    
    }        

    $output = ([System.DirectoryServices.ActiveDirectory.Forest]::GetForest($adCtx))    

    Return $output
}


By

by

How to Populate a ObjectDataSource from a Dataset

To use datasets for data manipulation and grid displaying is great in a SharePoint environment.  
The .NET framework offers many displaying controls for that task amongst them is the SPGridView. Grid views are excellent for presenting data because people like to see things organized in grids. it is almost natural to our eyes and project stakeholders love grids because they are like the heart and soul of a project management report.
If you are using SharePoint it is pretty straightforward to instantiate a SPGridView control and then use the datasource property to point to a dataset.
So let's say, you want to display all the team sites or site under a specific URL. you can populate a dataset with the rows and bind to the grid.

sharepoint-objectdatasource-spgridview-dataset-1
The only issue here is the network traffic. Every time you perform a postback you will force the dataset to be loaded and then the grid will just change the page displayed, but under the hood the whole dataset was there populated. If you have hundreds of sites and these are being accessed by multiple users it can potentially be using unnecessary bandwidth. ( note: There are strategies to place around this mechanism like using cache objects and persisting information in the viewstate, but we wont be discussing them here )
sharepoint-objectdatasource-spgridview-dataset-3 
 
Would not be great if we could have a out-of-the-box structure good enough to allow fetching the necessary records for a specific page?
For that we can use the ObjectDataSource control.

sharepoint-objectdatasource-spgridview-dataset-2
You can read a lot about the usages of the ObjectDataSource all over the net, but if you are like me a big fan of datasets and you have been dealign with datasets objects in many legacy applications, you want to just want to have an easy way to migrate your datasets to ObjectDataSources.
Unfortunately, the ObjectDataSource control does not have a property like objectDataSource.DataSource neither it has a LoadFromXml or Load(Dataset)...
So how do you do?
Here's how I find it: using reflection.

ObjectDataSources do not have a property to perform something like MyObjectDataSource.DataSource=MyDataSet, but it does have a constructor that allows you to parse classes and extract data methods.
So let's say you have a scenario like this in a webpart
        /// <summary>
        /// Called by the ASP.NET page framework to notify server controls that use
        /// composition-based implementation to create any child controls
        /// they contain in preparation for posting back or rendering.
        /// </summary>
        protected override void CreateChildControls()
        {
            base.CreateChildControls();
            Grid = new SPGridView
                           {
                               AutoGenerateColumns = false,
                               AllowSorting = true,
                               AllowPaging = true,
                               AllowFiltering = true,
                               PageSize = 10
                           };
 
            Grid.DataSource = MyDataSet.MyTable;
            Grid.DataBind();
        }

To convert this to an ObjectDataSource you then do this...
        /// <summary>
        /// Gets the data table for object source.
        /// </summary>
        /// <returns></returns>
        public DataSet GetDataTableForObjectSource()
        {
            // do whatever you want to do here and
            // return the table with the data
            return MyDataSet.MyTable;
        }
 
 
        /// <summary>
        /// Called by the ASP.NET page framework to notify server controls that use
        /// composition-based implementation to create any child controls
        /// they contain in preparation for posting back or rendering.
        /// </summary>
        protected override void CreateChildControls()
        {
            base.CreateChildControls();
 
            // in this constructor specify the type name, the class name and
            // the public method inside this class where the object datasource will retrieve the data
            // make it a signed assembly for security reasons.
            var edgeDataSource =
                new ObjectDataSource(
                    "MyNamespace.MyClass, MyNamespace.MyClasss, Version=1.0.0.0, Culture=neutral, PublicKeyToken=ce8ab85a8f42a5e8",
                    "GetDataTableForObjectSource") {ID = "EdgeDataSource"};
 
            Grid = new SPGridView
                           {
                               AutoGenerateColumns = false,
                               AllowSorting = true,
                               AllowPaging = true,
                               AllowFiltering = true,
                               PageSize = 10
                           };
 
            // do not use DataSource property. MUST USE DataSourceID with the control name
            Grid.DataSourceID = "EdgeDataSource";
 
            // do this before the databind
            Controls.Add(edgeDataSource);
            Controls.Add(Grid);
 
            // bind the objects and execute the call
            //specified in the ObjectDataSource constructor
            Grid.DataBind();
        }
 
Cute trick!
So there you go. To migrate, load, or populate ObjectDataSources using DataSets, all you have to do is to wrap the data returned in a public class and pass the method information to the ObjectDataSource constructor. I hope this helps you guys out there using ObjectDataSources.
Now go coding. Happy paging, happy filtering, happy caching!

By